


How To Free Up Disk Space on Windows Servers
Are you looking to save disk space on your Windows Server system? Then you already know that having enough free storage is essential for sustaining good server performance.
When you start running out of disk space, you will notice a swift downturn in server performance, and some automated tasks, such as backups, will start failing.
So take a look at what's eating up space on your server's drive and how you can free it up.
Why Does Your Server Disk Get Full?
The size of your server's hard drive(s) is the primary factor that will determine if running out of space is a rare event or a frequent occurrence. If you're managing the server yourself, you might only notice it's running out of space if you've set up special notifications or regularly checked the status of your backups.
Server and website backups consume a lot of storage space and will eventually exhaust your capacity if not appropriately maintained. Similarly, log files, temp files, and databases can build up endlessly, either on your hard drive or in the recycle bin.
Schedule regular server disk space inspections, every month or as needed, and go through the five steps outlined below to save disk space on your Windows Server system.
5 Ways to Save Space on a Windows Server
Delete Outdated Backups
If you've never removed server backups before, eliminating older backups will likely free up multiple gigabytes of space.
Prevent this from reoccurring by clearly defining a backup retention strategy and sticking to it. To start off, ask yourself if you need to keep your backups for a few weeks, months, or even years.
Check your Windows Server backup directory to get a list of all backups generated so far, and delete the ones you no longer need. Those of you running an SQL Server should also look for its backups and either delete old ones or compress them to save space.
Optimize SQL Databases
There's also the option of reducing the size of your databases. This depends on the amount of information stored in them. Just follow the steps outlined below:
(Note: To save disk space on your Windows server, it is best practice to ensure all data is securely backed up before making any changes to your SQL server or databases.)
- Right-click on the database and select Tasks, followed by Shrink, and then Files.
- Select Reorganize pages before releasing unused space.
- Set Shrink file to the minimum available amount.
See the image below for reference:

Clean Up IIS Log Files
Internet Information Services (IIS) log files, like backups and databases, can use most of the available server space over time. However, there are a few options to tackle this issue.
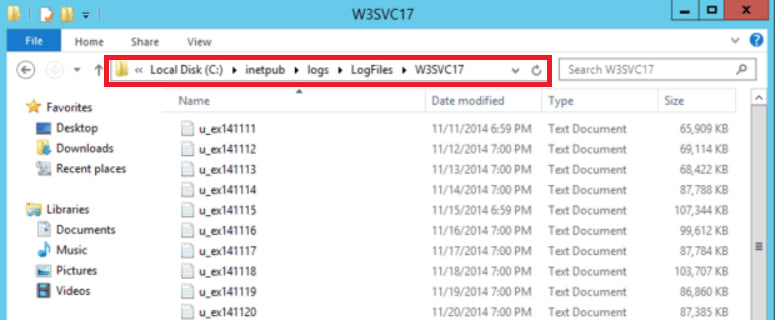
IIS logs are saved by default in the LogFiles directory, which can be found at C:\inetpub\logs\LogFiles. In most cases, you’ll want to put the LogFiles directory on your largest drive and preferably at the root, so you remember its location.
See the image below for reference:
Alternatively, you can compress the IIS logs directory and reduce its size significantly. To do this, just follow the steps outlined below:
- Right-click its directory and select Properties.
- Click on the General tab and then Advanced.
- Select Compress contents to save disk space.
- Click OK, followed by Apply, and finally, OK.
To prevent this issue from recurring, you can write a script that will delete old IIS log files and schedule it in the Task Scheduler found under Server Management > Tools.
Uninstall Third-Party Software
Sometimes the way you utilize your server changes over time. Some tools you thought you required are no longer applicable to your circumstances.
This implies that you may have unneeded software that can be deleted to save disk space on your Windows Server system. To uninstall such software, follow the steps outlined below:
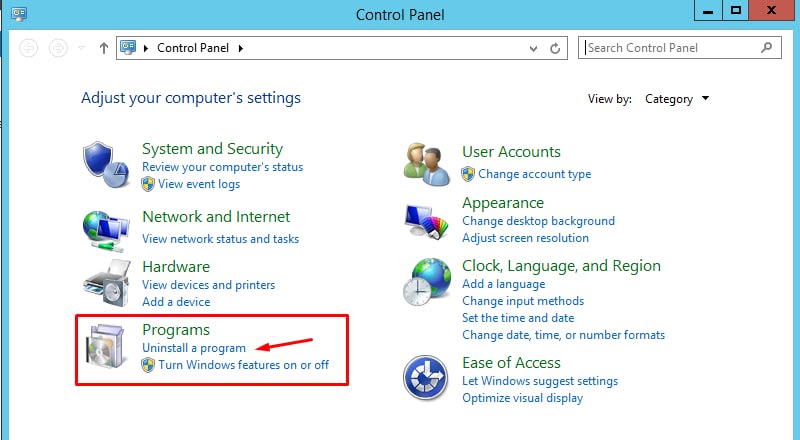
- Use the Win+X shortcut to open the Control Panel
- Click on Uninstall a Program
- Check the list carefully and click Uninstall on anything you no longer need
See the image below for reference:
Add More Server Disk Space
Cleaning your server's hard disk regularly will prevent your server from running into issues and enhance overall performance. But the amount of storage you have will eventually become insufficient as your websites grow.
The good news is that expanding your server's disk space can be done easily with Liquid Web’s help. Reach out, and the team there will happily help you.
After completing all these steps, don’t forget to empty the recycle bin. If it’s not showing up by default, you can follow these steps to make it show:
- Open Windows Explorer and observe its top menu.
- Click on the View tab > Options > Change folder and search options.
- Click on Show hidden files, folders, and drives.
- Uncheck Hide protected operating system files as well.
- Click Apply to save the change.
Why Having Free Server Space Is Important
Here are the most common reasons why having free server space is important:
- The Server software needs space to operate because it actively writes data such as backups, logs, and session files to your hard drive.
- When you’re low on disk space, your server can’t make backups, and you risk losing data.
- Most websites grow with time and need more space, especially the ones that accept user-submitted content.
Is Freeing Up Space the Same Process for All Types of Servers?
At this point, you might be wondering if there’s a difference between cleaning space on servers like VPS and Dedicated.
In this case, there’s no difference as long as the servers use the same operating system - Windows, for example.
Final Words
Now you know how to save disk space on your Windows server. As long as you follow the five-step guide, you may be able to improve your server’s stability and security.
If you want a worry-free backup experience, consider our Acronis Cyber Backups service. It will ensure your data is protected, secure, and recoverable. And because it is an off-server solution, your server storage is free from housing backups.
Ready to take your Windows hosting experience to another level? Take a look at Liquid Web’s Managed Windows Hosting plans, and never compromise on storage options or support services again.


Joseph Molloy
Liquid Web Security Operations tech Joseph spends his days cleaning up malware and doing his part to keep the Internet safe. He is interested in all things Linux and always looking for something new to learn. In addition, he enjoys cooking and playing guitar, is an avid horror and sci-fi reader, and is a fan of black metal music.


Keep up to date with the latest Hosting news.