


How to Create Your Own Minecraft Gaming Server
One of the best ways to enjoy Minecraft is playing with other players. You can make your own Minecraft server to create a network for your close-knit community of Minecrafters to enjoy.
Just about anybody can create a Minecraft server, but there are some challenges in doing it yourself, and in hosting it on your personal computer. Learn how to set up a Minecraft server and see why you might benefit from a premium server.
What is a Minecraft Server?
A Minecraft server is a game server made to specifically host online multiplayer lobbies of Minecraft. By using some software from Mojang Studios, the video game developer of Minecraft, players can choose to use their own computers as Minecraft servers. Alternatively, players can use a hosting service to set up a dedicated gaming server for their Minecraft world.
There are also several public Minecraft servers that players can join, including those run by Majong and others run and hosted by third parties.
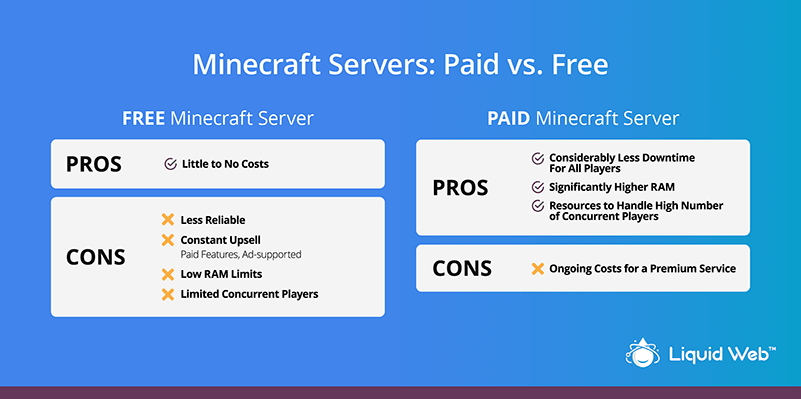
Minecraft Servers: Paid vs Free
Renting server space is a common solution to hosting Minecraft servers remotely, but there are also free options. As is true with any free services, there are always some things to keep in mind.
Free Minecraft Server Pros:
- Little to no costs.
Free Minecraft Server Cons:
- Less reliable.
- Constant upsell of paid features, ad-supported.
- Low RAM limits.
- Limited # of concurrent players.
Paid Minecraft Server Pros:
- Considerably less downtime for all players.
- Significantly higher RAM.
- Enough resources to handle a high number of concurrent players.
Paid Minecraft Server Cons:
- Ongoing costs for a premium service.
For one, they are often ad-supported and will try to upsell you on paid features. Free servers are also known to be less than reliable, which is a problem if you want a good experience for all players on your server. Lastly, another big concern with free Minecraft servers involves limitations. Most free services will limit the number of players that can be on the server and come with a low RAM limit.
With paid Minecraft servers, your money goes a long way towards keeping downtime to a minimum. Additionally, a premium server has more than enough RAM and resources to handle a robust network of players.
Benefits of a Minecraft Server
There are some common benefits to setting up your own Minecraft server, whether you do so on your own computer, a paid server, or a free remote server.
These benefits include:
- Control: You get to make the rules and set the parameters. Your Minecraft server is your world. This is especially appealing for tech-savvy parents who want to create a safe space for their children to play.
- Community: Whether you are building a growing network of new players or an established circle of friends, your Minecraft server can serve as a center point of your community.
- Monetization: Create a beautiful world people want to visit and interact with. The more your users enjoy the server, the more they will be willing to donate to you. You could also sell cosmetic features on your server.

Renting a Minecraft Server or Building a Home Server?
Perhaps one of the biggest decisions to be made when looking into how to set up a Minecraft server is whether to host it on your own computer or to pay to have it hosted with a hosted provider, thereby renting the server space and hardware.
The most obvious difference between the two is that hosting your Minecraft server on your own computer doesn’t cost anything, whereas renting a Minecraft server does. Before making this decision, factor in these considerations regarding renting a server or building one at home:
- Resources and Performance: The truth is that your personal computer might not be able to handle the demands of hosting multiple players on your Minecraft server. Also, your residential Internet might bog down gameplay. A paid server built to handle high demands, and connected on commercial-grade Internet should handle your needs quite well. Also, do you plan for the future growth of the server? Unless you invest thousands of dollars in server hardware, opting for a paid dedicated hosting service can ensure a great gaming experience for all.
- Availability: Chances are the players you have joining you on your Minecraft network will want access to your server throughout the day. You might not be ready to keep your computer on 24/7, especially considering power costs. A premium, paid Minecraft server should be available for you and your fellow players around the clock.
- Setup: Making your own Minecraft server means making sure your system can handle game and player demands. Plus, setup does require some work and better-than-average computer skills. A paid Minecraft server provider will take care of most of the technical issues for you.
- Security: Distributed denial of access (DDoS) attacks on Minecraft servers are very common. Essentially all Minecraft server hosts offer at least some game DDoS protection. DIY servers might not be able to thwart this very real threat. If your goal is to create a private, monetized Minecraft server exclusive to your subscribers or community, attacks could potentially create negative experiences for gamers to the point where you risk losing these subscribers (and revenue). When considering a premium server hosting option, shop around for providers that offer built-in features with their servers that explicitly mitigate the actions of malicious players and trolls.
Building your Minecraft server on your PC can be a viable option if you plan on keeping your network to a small group of trusted friends. However, if you want to open it up to more players, especially those you might not personally know, renting a dedicated server is probably the way to go.
Check You Have the Right Hardware and Requirements
Before you start setting up your own Minecraft server, check to make sure your hardware meets at least these minimum requirements:
- RAM:
- 1GB (1-2 players), or up to 35GB (9+ players) on most operating systems
- 2GB on Windows Vista/7/8/10
- CPU:
- Windows 2000/2003/NT/2K/XP:
- Intel Pentium 4 2.0 GHz or AMD Athlon XP 2000+
- Windows Vista/7/8/10:
- Intel Core-Based or AMD K8-Based
- MacOS and Linux*
- Intel Pentium 4 1.8 or AMD Athlon XP 1600+ or G4/Freescale 7xxx 1.8Hz
- Windows 2000/2003/NT/2K/XP:
- HDD:
- 2GB of empty space on most operating systems
- 10GB on Windows Vista/7/8/10
- WAN:
- Download Speed: 3Mbps
- Upload Speed: 2Mbps
These minimum requirements are for the server only. If you’re also planning to play on the same computer, you’ll need to account for the game’s minimum requirements.
How to Set Up Your Minecraft Server
Before you get to learn how to create your own Minecraft server, it does require a solid knowledge of computer basics. Having some preexisting knowledge of how to create your own game server can be helpful, but it should be relatively simple for tech-savvy individuals.
The general steps for making a Minecraft server are the same once you get Java installed on your machine (see below for operating system-specific instructions).
To get started building your Minecraft server, follow these steps:
- Download the Minecraft server jar file from Mojang.
- Create a new folder for the jar file.
- Open command prompt or terminal.
- Type cd followed by the path to the jar folder you created.
- Run the server by typing: java -jar name_of_the_jar_file.jar –nogui.
- Accept the EULA.
- Open eula.txt and change eula=false to eula=true.
- Run the server again by typing: java -jar name_of_the_jar_file.jar.
At this point, you officially have a Minecraft server up and running. From here, you can start configuring the server to your liking.
How to Make a Minecraft Server on Windows
The first step in how to create a Minecraft server on Windows is to make sure you have the most recent version of Java installed on your computer. If you don’t already have Java installed, you can download it from Oracle or JDK.
To check to see if you have the latest Java version installed and update if you don’t, do one of the following:
- Find and open Java in the Windows Control Panel and click Update Now.
- In a command window, type: java -version to get your current version number. Check the Java website to see if it’s the latest version available.
Once you verify that you have the latest Java, take the general steps above to get your server running.
How to Make a Minecraft Server on MacOS
You will need macOS 10.4 or newer to run a Minecraft server.
Make sure you have Java installed before taking the general steps above to start up your Minecraft server by doing the following:
- Type in the terminal: java -version. The version should be at least 1.6.
- If there is no Java on your machine, type: /bin/bash -c "$(curl -fsSL https://raw.githubusercontent.com/Homebrew/install/master/install.sh)" to install.
With Java installed, take the general steps mentioned earlier to get your server running.
Creating a Server Your Community Will Love
Having your own Minecraft server can help you take more control over how you play the game and with whom you play. However, now that you have a general idea of how to set up a Minecraft server, you can see that it does take some resources from your computer and does require some know-how. Not to mention, there are security issues your system might not be able to handle.
If you want to rid yourself of the pain points of setting up a Minecraft server, like server resources and DDoS mitigation, using a premium dedicated server is the way to go. Learn all about how Liquid Web’s Managed Dedicated Hosting can be your best solution, and how Liquid Web’s DDoS Protection can help keep your server safe from trolls and malicious players.


Jeremy Sorensen
Jeremy Sorensen started his career with Liquid Web eight years ago and has never looked back. As a product manager for Managed Hosting, Jeremy has accumulated a wealth of knowledge via his past roles in sales and training in web hosting. He also has a deep passion for technology, especially in hosting, and offering the best solutions to meet business needs is what excites him most. In his free time, you can catch him gaming, exercising, traveling, or taking some drone photography. And his most favorite pastime is spending time with his dog, Rex.


Keep up to date with the latest Hosting news.