


Setting an iPad up for Web Development
Ever wonder if you could use your iPad as a web development tool?
Maybe even your daily go-to solution?
With iPadOS having arrived in September 2019, your iPad now has software that better reflects the power that the hardware has.
I’m going to walk you through how I have my iPad Pro setup to develop sites as I’ve spent the last 18 months using an iPad as my main working device. While I have a maxed out 2018 12.9” iPad Pro, I’ve been using basically the same setup since my 9.7” iPad Pro started me on the journey of developing with an iPad.
I’ve even tested it with my daughter’s iPad Mini 3. While the Mini had a slow UI, it worked reasonably well once I was coding on the server.
What we’re ultimately going to do is use our iPad to connect to a VPS and do our development on the VPS exactly like we’d do it on our local machine running MAMP, VVV, or XAMPP.
What Software is Needed to Use the iPad for Web Development?
Let’s start with the software, because the hardware doesn’t matter so much. All you need is an iPad of any recent variety and you’ll be ready to get coding.
Blink Shell
First up, you’re going to need to install Blink Shell on your iPad because much of what we’re going to use will be Linux/Unix based tools like Vim and Blink is by far the best shell on iOS for this.

Blink will support custom SSH keys for your devices. It will remember and auto-fill your connections to your various server environments, and it supports MOSH. We’ll get into configuring Mosh and what it is later in this article.
Secure ShellFish
While I do much of my sFTP work directly via Blink currently, you’re going to need a solid FTP client, such as Secure ShellFish.
Inspect
For a web browser, the best option I’ve found is Inspect. It has a full set of web inspection tools, and a console so you can view an output that your site is sending to the console. It even provides a quite nice Tap to Inspect mode that lets you select HTML elements and see them in the provided developer tools.

Jayson
Finally, browse json files directly on your iPad with Jayson. With a simple copy and paste operation, you can view the JSON output of your work so that you can make any tweaks that are needed to get it right.
The rest of the software we’re going to need to make developing on your iPad work well is found on the VPS we’re going to use.
Configuring your Server
For this tutorial, I’m using a 4GB VPS running Ubuntu 16.04.6 LTS, but you could use a higher or lower version depending on the needs of the sites you’ll be developing. You can also use any of the Linux based VPS configurations Liquid Web offers.
One of the great things about an iPad is that it’s extremely portable, but that often means it’s on less reliable connections than a laptop is. Where my iPad connects flawlessly sitting six feet from my wireless router at home, it drops enough packets at Starbucks or on a cellular connection that a traditional SSH tunnel to our server will disconnect a few times during a work session. We can stop this frustration by getting Mosh and tmux setup on our server.
What is Mosh
Mosh is very similar to SSH but has been engineered to deal with mobile connections. It will stay connected to your server even if the IP changes or you move from WiFi to a cellular connection. It also resists getting put to “sleep” better than SSH does because it’s not simply a connection, Mosh builds sessions over UDP.
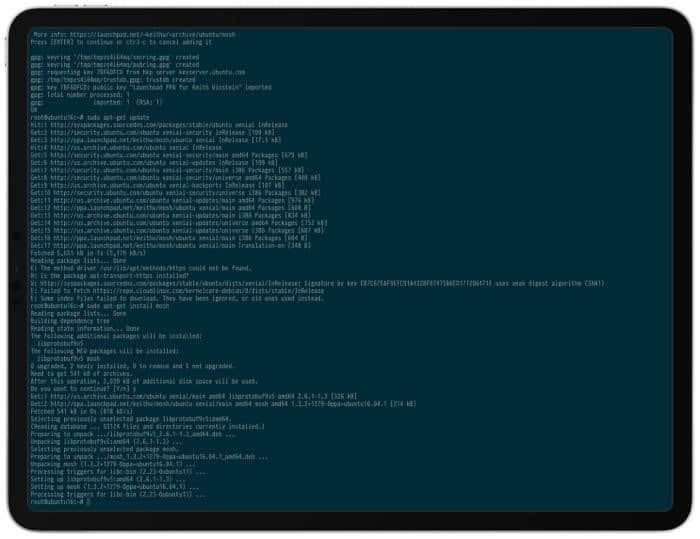
To install Mosh on our Linux server we’re going to need to run the following commands.
sudo apt-get install python-software-properties
sudo add-apt-repository ppa:keithw/mosh
sudo apt-get update
sudo apt-get install mosh
If you’re not familiar with those lines then here is a quick recap. The first one installs some of the tools we’ll need to get Mosh installed. Our second line adds the software repository needed to install Mosh. Once we’re done with that, we need to tell our Ubuntu install to update all it’s packages so that it knows about the new repository. Finally, we tell our Ubuntu install to install Mosh.
Next, Mosh operates on a different port than other connection methods so we need to make sure that we have those ports open on our server. First, we’re going to need to install UFW on our Ubuntu VPS with the following command.
sudo apt-get install ufw
Then we need to open up the proper ports so that mosh can connect to our server on the ports it expects to connect with.
sudo ufw allow 60000:61000/udp
That’s it! You should now be able to use mosh in place of SSH when you use Blink to connect to your server. That means your commands will look like this.
mosh user@server.location
tmux
The next tool that will make your development workflow so much easier is tmux. This tool is a terminal multiplexer. What it’s going to allow you to do is use your single mosh connection to open multiple terminals on your VPS and then switch between them.
I regularly use this to have multiple terminal connections:
- To the Git repository I’m working in
- To Vim for editing my code
- Running Grunt or Gulp, or whatever my build tools are for the project I’m working on
Tmux is going to be installed on our servers for you, so all you need to do to get started is type tmux and you’ll start a tmux connection.
Like Vim, which we’ll talk about in a moment, tmux is keyboard based. In its default configuration, tmux looks for Ctrl+b to be pressed and then accepts the next keys as commands for what it should be doing. While there is a huge list of awesome stuff you can do with tmux, here are a few commands you need to get started.
Remember every command is prefaced by CTRL+b
d to disconnect from a session
n to change to the next open tmux window
p to change to the previous window
$ to name the session or rename it
c create window
, name current window
& kill current window
a -t $name attach to a named session
ls list the name sessions
tmux kill-session -t $name from terminal this kills the named session and is not prefixed
To dig deeper, here is a great list of all of the tmux commands available. Tmux can split panes, swap them around, and do all sorts of other fancy stuff once you’ve mastered the basics.
Vim
The final piece of the puzzle to be able to develop from your iPad is having a solid Vim configuration. I focus on WordPress so I’ve built a PHP and WordPress-based vim config that I’ve shared on Github. If you’re just getting started, use an established configuration like the one above, Janus.
The biggest issue with using someone else’s configuration is that sometimes they stop maintaining it. Taking Janus as an example, it hasn’t seen an update in a year and currently has 87 open issues. My own hasn’t been updated in 9 months and I know that Exuberant CTags has been abandoned so I need to look at updating to Universal CTags.
Let’s go over how to install my specific Vim configuration. To start we’ll need to clone the repository:
git clone https://github.com/curtismchale/WPTT-Vim-Config.git ~/.vim
If you get an error that your .vim directory already exists then use rm -rf ~/.vim to remove the existing vim configuration so we can put our own in its place.
Next, since the Vim version on our stock Ubuntu server is 7.4.X we’ll need to use a plugin manager to keep our vim plugins up to date. I like Vundle and it can be installed with this command:
git clone https://github.com/gmarik/Vundle.vim ~/.vim/bundle/vundle
Next, if you’re installing my Vim configuration on macOS, let’s make sure that our configuration for gVim and Vim will use the same file by creating symlinks so that there is a single .vimrc file that houses our entire configuration.
ln -s ~/.vim/.gvimrc ~/.gvimrc && ln -s ~/.vim/.vimrc ~/.vimrc
Then you’ll need to open Vim vim . and run :BundleInstall to install the full configuration. Yes, you will get an error when you try to open vim because there are a few plugins expected that we haven’t installed yet.
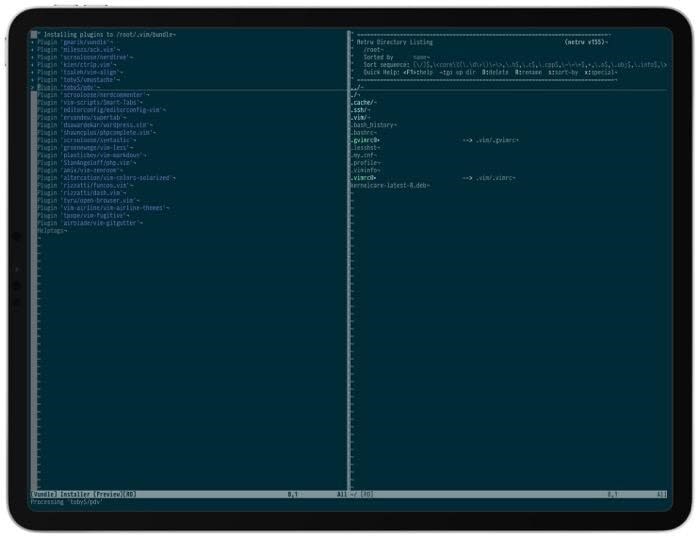
Once you’ve run :BundleInstall you can type so ~/.vimrc to reload your vim configuration with all the plugins installed.
To finish our configuration out we’ll install Exuberant CTags and Ack so that we can have full searching inside our projects. The following two commands will do this for us.
sudo apt-get install exuberant-ctags
sudo apt-get install ack-grep
You’ll still need to configure Git with your username and email so that you can work properly, but that’s really it. We now have a full IDE like Vim setup on our remote server. I use this remote server just like I would a local development environment. I use Deploybot to deploy my changes to the staging server that my clients can look at as well as the live production server when we’re ready to go live.
Where Using iPad for Web Development Isn’t Cutting it for Web Developers
While I love the iPad for its portability and single-focused method of working, there are still some spots that it doesn’t cut it for developers. Specifically, if you’re doing heavy design focused work with CSS, even Inspect browser isn’t quite up to the same quality as the Developer tools you’ll find in any modern desktop browser.
When I’m doing a lot of CSS work, I end up using macOS, but I use all the same tools and workflow above. The only change is using iTerm to connect to my remote server and Firefox as my browser and developer tools. Once we get better browser-based developer tools, we’ll be able to say goodbye to macOS for every part of the site development process without a drop in productivity.
Even if you don’t choose to make your iPad your primary work machine as I have, the tools above can be used by any developer in a pinch when they don’t have their regular development environment on hand. Whether it’s rolling back some code from the couch with Blink and Deploybot, or making a quick change because a client edited a file and missed a semicolon, you can get a lot done without needing a traditional development environment, with a bit of prep.
Build Out Your Digital Agency With Managed Hosting


Curtis McHale
Curtis is a husband, father, developer and business coach. He specializes in helping people build a business that lets them spend time with their family instead of working all the time. To learn more about running an effective business visit my website Curtis McHale.


Keep up to date with the latest Hosting news.